SmartTrade Blog
What is happening at SmartTrade
Voice recognition on ST Mobile
- Font size: Larger Smaller
- Hits: 16922
- 0 Comments
Voice Recognition Dictation into SmartTrade Mobile
Dictate text into SmartTrade Mobile using the voice recognition feature on your smart device!
Most modern smart devices enable the user to dictate text using voice recognition.
Voice recognition dictation works with SmartTrade Mobile so give it a try, a little practice and you will be a wiz!
SmartTrade users will be amazed how much time can be saved dictating notes rather than having to type them in, it even autocorrects possible spelling mistakes! Voice recognition can even be used for entering numbers which is particularly useful when entering data into SmartForms.
Important!
- Not all smart devices are the same so you will need to check out your device’s capabilities!
- Using the smart device’s native voice recognition service will consume data if your device is connected through the cellular network! For more information about how this works see below.
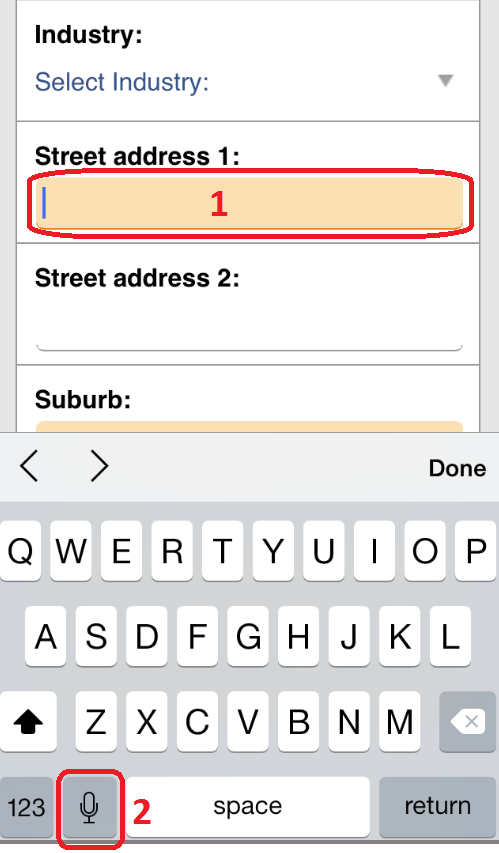
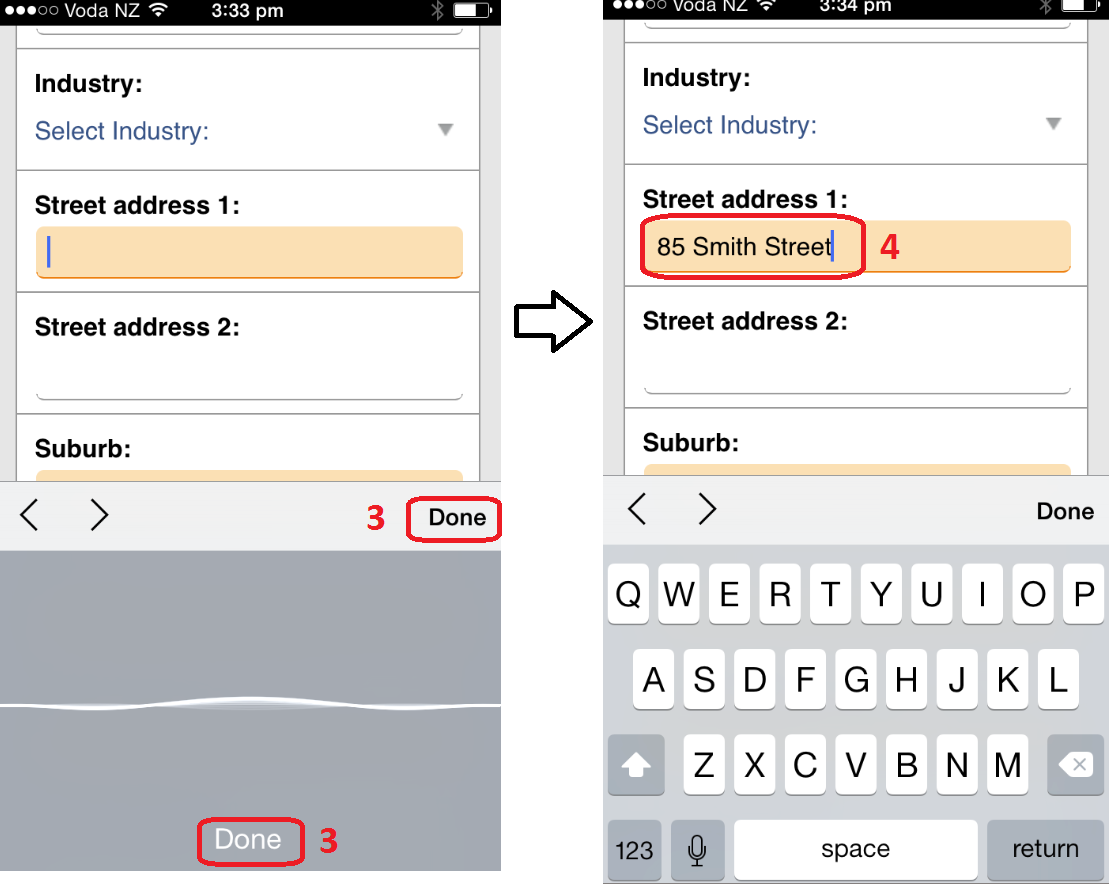
Voice Recognition – how to use it
 |
On Android Devices(shown on a Samsung Galaxy S5) Using the native functionality:
To download an offline app:
|
 |
On Apple Devices - shown on an iPhone 5s Using the native functionality:
To download the offline app –
|
 |
Voice Recognition - data use
|
 |
Voice Recognition – tips (from the Apple website) Talk into the microphone: You don’t need to speak very loudly; but you should keep your smart device close to your mouth, especially if you’re outdoors. On an iPhone are two microphones at the bottom, but only a single microphone on iPads, located at the top of the device. It’s not easy to speak directly into the iPad mic while looking at the screen. Speak into the tiny hole at the top of your tablet. You’ll find dictation in noisy environments works much better with an iPhone, because it’s easier to speak close to the microphone. The iPhone also has a noise-cancelling mic, which filters out background noises. You might find that the Apple earbuds that come with an iPhone—which have an inline mic—offer better speech recognition, as do third-party headphones with mics, as long as you hold them fairly close to your mouth. The problem is Apple didn’t give the iPhone 7 an air phone jack. Dictate when connected to Wi-Fi: Dictation to an iOS device requires that your voice be sent to a server, where it is recognized and transcribed, and then sent back to your iOS device. For this reason, dictating to an iOS device works best when you’re using Wi-Fi; it also works well with a 3G connection; but anything slower is hit or miss, in my experience. Speak clearly: You don’t need to speak especially slowly, but speaking too quickly will lead to errors. The general idea is to talk like a newscaster: Enunciate, but don’t exaggerate. Don’t say too much: Your voice has to be sent to a remote server, so keep your dictation segments under 30 seconds. (Longer than that might be too much for a 3G connection.) Speak punctuation and symbols: To include punctuation in your dictation, you need to say “comma,” “period,” “hyphen,” and so on. Watch out for language differences. For instance, if you’re using British English, you need to say “full stop” instead of “period.” You can say “new line” to dictate a return character, and “new paragraph” to add two returns. You say “apostrophe” for a possessive noun, such as “Jerry Garcia apostrophe S guitar,” for Jerry Garcia’s guitar. You’ll also say things like “dollar sign,” “euro sign,” and “pound sterling sign” to get type the corresponding symbols. When you want to capitalize a word, say “cap.” If you’re sending a message to someone about a movie preference, for example, you might say “I’d like to watch cap lord of the cap rings.” Take advantage of autocorrect: While you can’t correct mistakes in iOS dictation by voice, you will occasionally see words that iOS thinks might be incorrect. They appear with dotted blue lines underneath them. Tap an underlined word or phrase, and you’ll see one or more options you can choose from. Add emoticons: Do you want to type smileys? It’s easier to dictate them than to switch to the number keyboard. Just say “smiley,” “winky,” or “frowny,” for :-) , ;-) , or :-( . Proof read what you dictate: While some errors will be obvious, and other misinterpretations may have blue dotted lines highlighting them, there will be typos—or, more correctly, speech-o’s. As you get used to dictating into your iPhone or iPad, you’ll figure out the right cadence and volume to get the most precise recognition. If you need to type a lot on an iOS device, try using dictation. Whether you use it for text messages or emails, it may save you a lot of time. |
If you want a more comprehensive beginners guide to voice recognition dictation have a look at this article.
https://zapier.com/blog/best-text-dictation-software/
Spell Checking on SmartTrade Essential and Ultimate
 |
tinySpell - a free spell checker that works with SmartTrade Essential and Ultimate We sometimes get asked why SmartTrade Essential and Ultimate, our office based software solutions, don’t incorporate a spell checker. The reason is there are a many free online spell checkers that do a better job than we could do with our own spell checker. Our favourite free online spell checker is tinySpell, you can get it at http://tinyspell.com/. It’s easy to install and use so if you need a spell checker give it a try. If you want more information on tinySpell, an online search will throw up plenty of reviews. |
Comments
-
Please login first in order for you to submit comments


